Brief story about this post
You can skip this section if you are interested in getting your hands on it right away. No judging! However, I would like to story-tell what motivated me to write this post. At the moment of this blog post, I was studying for my AWS Associate Certificate and I wanted to get some hands-on experience before attempting the exam.
Moreover, I’ve always needed to deploy a professional website for myself so that I could share my knowledge on it and also to make it available to recruiters so that they could find out more about me. Honestly, I hated when I couldn’t fill in my website information on any form because I was too busy to deploy one. So finally I decided to deploy one while tackling a common AWS Associate Architecture.
Finally, the purpose of this section is to give you a warm welcome and hope that you enjoy this content. Thanks for taking your time to read this, you are an amazing person 🥰.
The Architecture
Before we dive into the architecture I will point out some requirements:
- The website should scale globally
- The content of the website are rarely written, so it should be read optimized
- Most of the content on the website is purely static, we generated them using a static site generator (in my case I used Hugo)
- Caching must be implemented on edge locations
- We must be able to track information about the visitors
- No need for private bucket, all content are public.
Disclaimer:
Please note that this is a MVP, if you are like me that don’t have much experience in frontend development I would advice you to launch your site with minimal features. If you are a more experienced frontend programmer keep in mind that the scope will be different and maybe this architecture will not be enough. Also, this architecture might not be perfect or optimal, I will try my best to deliver the most appropriate one given the knowledge I have.
Given the requirements above, we will implement the following architecture:

We will breakdown this architecture into different sections throughout this post. Hands on!
Static Site Generator
A Static Site Generator is a framework that generates a full static HTML website based on raw data and a set of templates. Essentially it is a tool that gets as input a predefined structural data and automates the task of coding individual HTML pages and gets those pages ready to serve to users ahead of time . Because these HTML pages are pre-built, they can load very quickly in users' browsers.
Static Site Generators are an alternative to Content Management System (i.e. Wordpress), but the former can be more cost-effective than the latter since we can generate the static HTML before hand and leverage S3 Static Webpages to host the files in an automated way. We don’t need to worry about servers or monitor workloads, AWS S3 scales very well and when integrated with cloudfront can deliver availability, performance, durability and scalability at low cost.
There are tons of Static Site Generators out there with different flavours and functionalities. You are free to choose the one most adequate to your skills and knowledge. I personally recommend Hugo. It is written in Go and is very fast to compile and easy to use. The documentation is complete and there are tons of themes you can choose from.
Once you have a skeleton that you would like to deploy just follow the steps below 🤩.
Deploying to S3
Let’s start with deploying the static website into S3 and check it is working as expected. Feel free to use the AWS Console, in my case I will use the AWS CLI tool.
Please make sure to have an IAM account that is not the root account for best security practice. Also make sure the account has the right role permissions. There is plenty of documentation around this and is out of the scope for now.
Once configured the aws-cli properly, issue the following command:
aws s3api create-bucket --bucket example.com --create-bucket-configuration LocationConstraint=sa-east-1
Let’s breakdown the command:
- we are telling aws to create a bucket named
example.com(please note the bucket names must be unique among all AWS accounts, not just yours. So watch out for errors). Also, according to the documentation we need to specify the bucket name the same as your FQDN in case of integration with route53 and cloudfront. - with
create-bucket-configuration LocationConstraintwe are specifying the region we want the bucket to be created. If you don’t specify a Region, the bucket is created in the US East (N. Virginia) Region (us-east-1). - if you have multiple AWS accounts set up you could add the
--profileto specify which account to use. - moreover, you should use the
--regionflag to specify the region on which you want to issue the command, in my case I will inherit it from my AWS profile, which is the same region as the value of theLocationConstraintflag.
By the way, you could encounter the aws s3 command or aws s3api command. The main difference between the s3 and s3api commands is that the s3 commands are not solely driven by the JSON models. Rather, the s3 commands are built on top of the operations found in the s3api commands.
Now that we have created our bucket, we will create a policy to make it publicly readable. Create the following JSON policy in a temporary folder, name it bucket_policy.json:
{
  "Version": "2012-10-17",
  "Statement": [
    {
      "Sid": "PublicReadGetObject",
      "Effect": "Allow",
      "Principal": "*",
      "Action": "s3:GetObject",
      "Resource": "arn:aws:s3:::{BUCKET_NAME}/*"
    }
  ]
}
Replace {BUCKET_NAME} with your own.
This is resource-based policy that allows the GetObject action to all accounts or users (aka principal). Now attach this policy to the bucket:
aws s3api put-bucket-policy --bucket example.com --policy file://bucket_policy.json
The following command will upload the static website:
cd ~/my_folder_with_static_website
aws s3 sync ./public/ s3://example.com/
You should see some logs of the files being uploaded. Please double check them so that you don’t upload sensitive information 🙄. Anyways, now let’s tell AWS that this bucket should be a website:
aws s3 website s3://example.com/ --index-document index.html
- The
--index-documentargument is a file that Amazon S3 returns when a request is made to the root of a website or any subfolder. - If you have written an HTML for errors you could add the
--error-document error.htmlflag.
ET VOILÀ! We have our S3 bucket configured with static website. To check the url of the static website, navigate to the aws S3 console and click on your bucket’s name. Go to Bucket Properties and scroll down to Static Website Hosting. You should see the URL there.
Securing your site with HTTPS
It is important to secure your site with HTTPS, for that we are going to use the AWS Certificate Manager to issue a public certificate and use it in the next section when we cover Cloud Front. You are free to upload your own certificate or to use free third party solutions like letsencrypt.
To request a public certificate issue the following command:
aws --region us-east-1 acm request-certificate --domain-name example.com --validation-method DNS --options CertificateTransparencyLoggingPreference=DISABLED --subject-alternative-names www.example.com
For more information about the parameters and command options check out the documentation. You should get and output like this:
{
  "CertificateArn": "arn:aws:acm:us-east-1:123456789012:certificate/12345678-1234-1234-1234-123456789012"
}
Note the we’ve created the certificate in the –region us-east-1, this is an explicit prerequisite to use cloudfront. You can create the certificate in one region and import it to us-east-1.
According to the documentation, as of April 30 2018, Google Chrome no longer trusts public SSL/TLS certificates that are not recorded in a certificate transparency log. So if you want to avoid this, you have to set the option
CertificateTransparencyLoggingPreference=ENABLEDand the certificate will get trusted by Google Chrome.
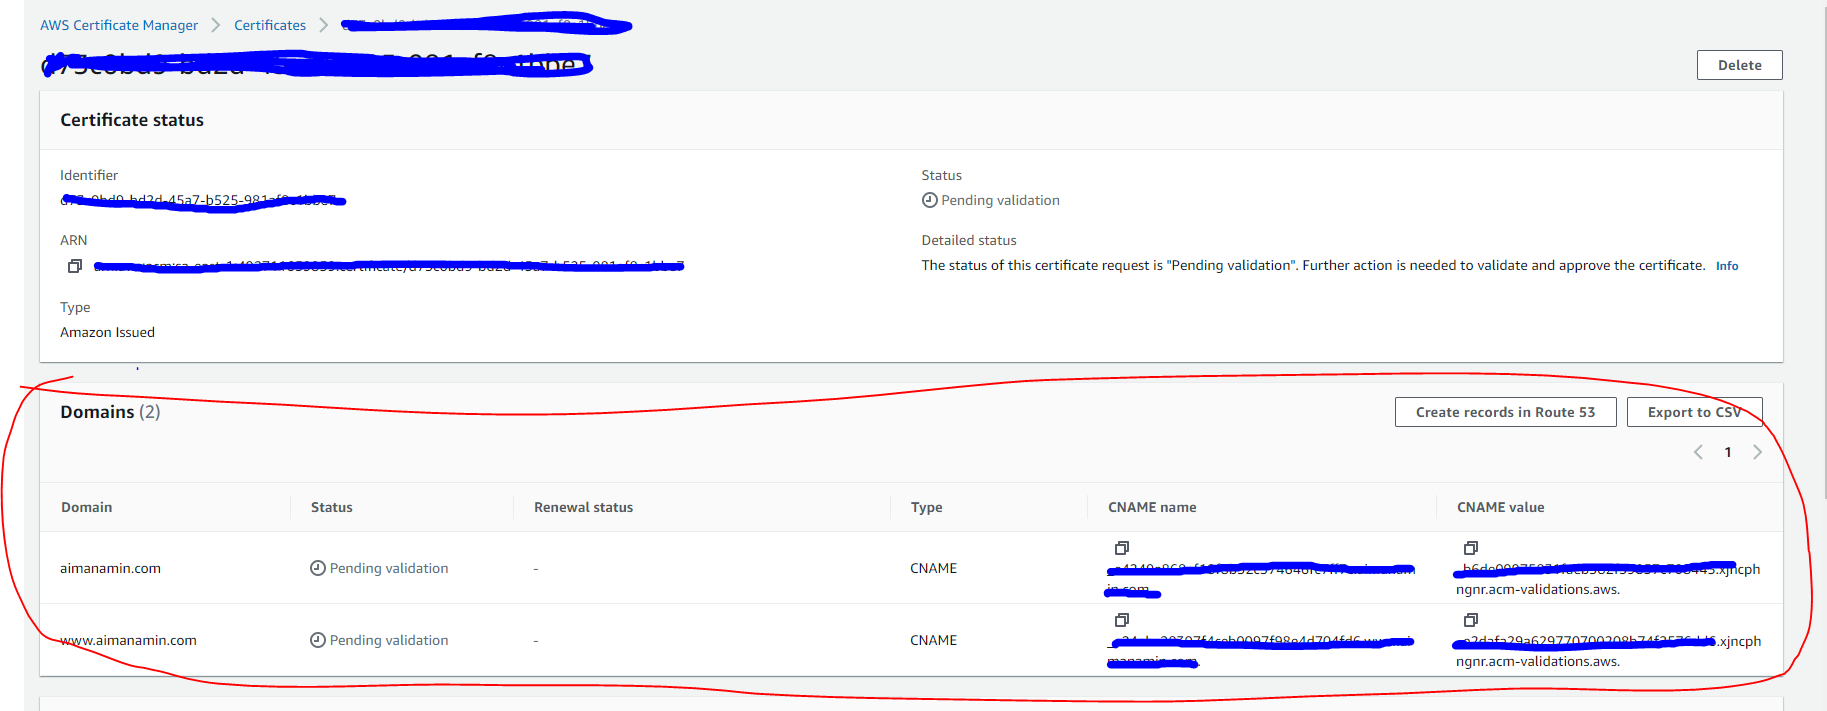
Now we have to validate the domain by creating DNS records, for that we will use the console and go to the ACM option -> click on the certificate and scroll down to the Domains sections. There should be pointed out what records need to be created. If you are using route53 you can click on Create records on Route 53 directly to create the CNAME records.
We can’t use HTTPS using S3 Static Website, however we are going to use Amazon CloudFront to serve a static website hosted on Amazon S3 with HTTPS.
Amazon CloudFront
We will configure Amazon CloudFront to improve the performance of the Amazon S3website, making it globally accessible while reducing the cost per retrieved S3 object. CloudFront accomplishes this by making files available from data centers around the globe (a.k.a edge locations). When a visitor requests a file from your website, CloudFront automatically redirects the request to a copy of the file at the nearest edge location. This results in faster download times than if the visitor had requested the content from a data center that is located farther away.
Going through the documentation you can find a lot of parameters and options to configure the distribution, we will use the most relevant ones. Before issuing a request to create the distribution write down the following parameters:
1 - the S3 root domain URL, you can get it logging into the console and searching within the properties tab the website url, in my case is: example.com.s3-website-sa-east-1.amazonaws.com. It is very important to get the url of the S3 Website, not the bucket endpoint.
2 - ARN ID of the public certificate generated in the previous section using AWS ACM.
Now create the following JSON configuration file, name it distribution-config.json:
{
  "CallerReference": "{Set Unique Caller Reference}",
  "Aliases": {
      "Quantity": 2,
      "Items": ["example.com", "www.example.com"] # Set your domains here
  },
  "DefaultRootObject": "index.html",
  "Origins": {
      "Quantity": 1,
      "Items": [
          {
              "Id": "{Set A unique Identifier}", # You can use example.com.s3-website-sa-east-1.amazonaws.com
              "DomainName": "{Set your S3 Root Domain Identifier}", # example.com.s3-website-sa-east-1.amazonaws.com
              "OriginPath": "",
              "CustomHeaders": {
                  "Quantity": 0
              },
                "CustomOriginConfig": {
                "HTTPPort": 80,
                "HTTPSPort": 443,
                "OriginProtocolPolicy": "http-only"
            }
          }
      ]
  },
  "OriginGroups": {
      "Quantity": 0
  },
  "DefaultCacheBehavior": {
      "TargetOriginId": "{Set your S3 Root Domain Identifier}", # example.com.s3-website-sa-east-1.amazonaws.com
      "ForwardedValues": {
          "QueryString": false,
          "Cookies": {
              "Forward": "none"
          },
          "Headers": {
              "Quantity": 0
          },
          "QueryStringCacheKeys": {
              "Quantity": 0
          }
      },
      "TrustedSigners": {
          "Enabled": false,
          "Quantity": 0
      },
      "ViewerProtocolPolicy": "redirect-to-https",
      "MinTTL": 0,
      "AllowedMethods": {
          "Quantity": 2,
          "Items": [
              "HEAD",
              "GET"
          ],
          "CachedMethods": {
              "Quantity": 2,
              "Items": [
                  "HEAD",
                  "GET"
              ]
          }
      },
      "SmoothStreaming": false,
      "DefaultTTL": 86400,
      "MaxTTL": 31536000,
      "Compress": false,
      "LambdaFunctionAssociations": {
          "Quantity": 0
      },
      "FieldLevelEncryptionId": ""
  },
  "CacheBehaviors": {
      "Quantity": 0
  },
  "CustomErrorResponses": {
      "Quantity": 0
  },
  "Comment": "",
  "Logging": {
      "Enabled": false,
      "IncludeCookies": false,
      "Bucket": "",
      "Prefix": ""
  },
  "PriceClass": "PriceClass_All",
  "Enabled": true,
  "ViewerCertificate": {
      "CloudFrontDefaultCertificate": false,
      "ACMCertificateArn": "{Set the ACM ARN ID}",
      "MinimumProtocolVersion": "TLSv1.2_2021",
      "SSLSupportMethod": "sni-only"
  },
  "Restrictions": {
      "GeoRestriction": {
          "RestrictionType": "none",
          "Quantity": 0
      }
  },
  "WebACLId": "",
  "HttpVersion": "http2",
  "IsIPV6Enabled": true
}
Please review the JSON and replace all values within the
{Set .....}.
Deploy the distribution:
aws cloudfront create-distribution --distribution-config file://distribution-config.json
Once you issue the command, a large JSON should be output. It means that CloudFront distribution has successfully been deployed.
Log Visitors Access
We want to leverage CloudFront Standard Logs, a.k.a Access Logs, to enable logging of visitors access activity. We are going to create a S3 bucket to store the logs. Issue the following command to create the bucket, you can choose any unique bucket name, but make sure to replace accesslogswebsite-example.com:
aws --region=us-east-1 s3api create-bucket --bucket accesslogswebsite-example.com
I am using the region us-east-1 because it is cheaper than my current region.
To make it simple, activate the access logging via web console. Just access you Cloudfront Distribution, edit the setting and enable Standard Logging. Specify the bucket and add a prefix to the logs for identification.
If you are interested in doing this with the AWS CLI, follow the documentation but basically you need to get the distribution config, modify the configuration and submit it using the
--if-match $ETag.
Configure your DNS configuration
In the route53 console, create a new record of type A for the root domain record as well as the www record, mark them as alias and point them to the cloudfront distribution. Additionally, you can configure an AAAA (IPv6) record following the same steps.
Final considerations
This architecture is going to be enough for beginners to start a professional website at low cost. I intend to mature the architecture as I progress and I will reference this post as the starting point. Here are some improvements I will make in the future:
- Configure S3 as bucket only and leverage OIA to restrict access only to CloudFront. I wanted to do that initially but had some problems with the way CloudFront delivers the root object of subdirectories. Since I am using Hugo, all subdirectories have an
index.html. When I configured CloudFront pointing to the S3 endpoint, the root page was working perfectly, however if I accessed subdirectories it would reply an error because CloudFront doesn’t know that it should give back theindex.html. One workaround is to use lambda@edge to overcome this, rewriting the URI. - Use Cognito Users and Identity Pools to manage users and allow for like and comments.
- Send a welcome email to subscribed users using AWS lambda + SES.
I hope you enjoyed this tutorial and found it useful. Please if you have any questions or feedback contact me at me@aimanamin.com.